Step by Step Guide with Breathing Instructions
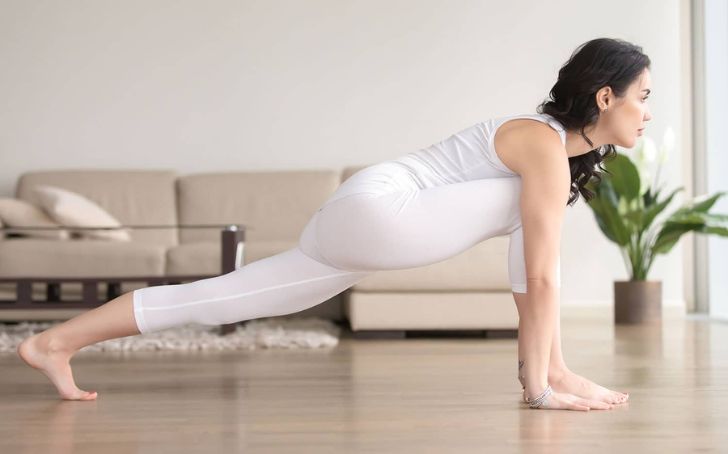
- Begin in a low lunge position with your right foot forward, knee stacked above the ankle.
- Extend your left leg straight back with the toes pointing backward
- Adjust Your Alignment – Ensure your front knee is directly above the ankle, and your back leg is extended straight.
- As you settle into the initial position, take a slow and deep inhalation through your nose
- Lower your hips toward the ground, feeling a stretch in the front of the left hip and thigh.
- Support the Pose- Place your hands on the mat for support, framing your right foot.
- Use props such as blocks under your hands for added support if needed.
- Gradually sink deeper into the pose by allowing your hips to descend toward the floor.
- As you begin to sink deeper into the pose, exhale slowly through your mouth or nose.
- While holding the pose, maintain a steady and rhythmic breathing pattern, allowing each breath to guide you into a deeper state of relaxation.
- Maintain a sense of stability and ease in the stretch.
Benefits of Butterfly Pose (Baddha Konasana)
- Hip Flexor Stretch Dragon Pose targets the hip flexors, providing a deep stretch in the front of the hips.
- Thigh and Groin Opening: It improves hip mobility and flexibility.
- Energetic Release: Yin Dragon Pose is believed to release blocked energy in the liver and gallbladder meridians.
- Improves Flexibility Regular practice enhances flexibility in the hips and lower body.
- Encourages Mindfulness:The extended holds in Yin Yoga poses, including Dragon Pose, promote mindfulness and introspection.
Beginner Tips:
1. Adjust the Back Leg: If the stretch on the back leg is too intense, slightly bend the knee or use a blanket under the knee for extra padding.
2. Use Props: Place props, such as blocks or cushions, under your hands for added support if reaching the floor is challenging.
3. Gradual Progression Ease into the forward bend gradually, respecting your body’s limitations.
5. Hold the Pose for 3 to 5 minutes, allowing enough time for the connective tissues to experience the stretch.
6. Switch to the other side after completing the first side.

Leave A Comment