Step by Step Guide
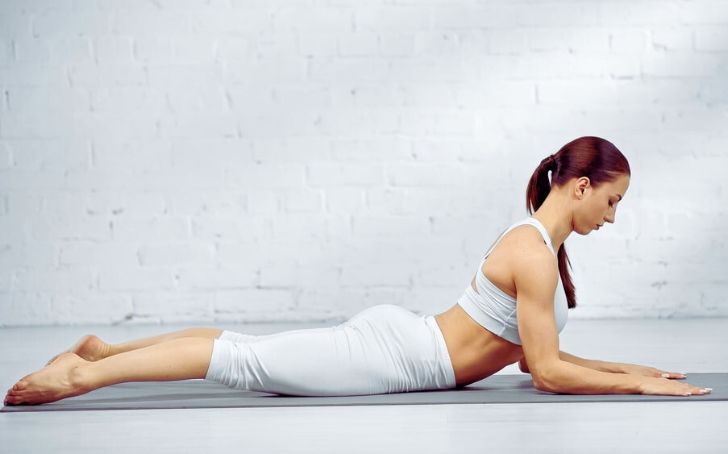
- Lie down on your stomach with your legs extended behind you.
- Place your forearms on the mat, parallel to each other and shoulder-width apart.
- Ensure your elbows are directly below your shoulders, forming a right angle.
- Spread your fingers wide and press your forearms into the mat.
- Engage your core muscles and gently lift your chest off the mat.
- Keep your hips grounded, and avoid putting excessive pressure on your lower back.
- Lengthen your neck by gently tilting your head back, but avoid straining the neck or compressing the cervical spine.
- Maintain a neutral and comfortable position for your neck.
- Soften your shoulders away from your ears, allowing your shoulder blades to move down your back.
- Feel a gentle opening in your chest and upper back.
Benefits of Sphinx Pose
- Spinal Extension: Sphinx Pose gently extends and opens the spine, promoting flexibility and mobility.
- Stimulation of Abdominal Organs: The pose stimulates the abdominal organs, potentially aiding in digestion.
- Mild Backbend: Sphinx Pose provides a mild backbend that can help alleviate mild back discomfort.
- Chest and Heart Opening: The pose opens the chest and encourages a sense of heart opening and vulnerability.
- Strengthens Core Muscles: Engaging the core muscles in this pose helps strengthen the muscles around the spine.
Beginner Tips:
1. Modify Arm Placement: If there’s discomfort in the lower back, try adjusting the distance between your elbows or placing a blanket under your hips for support.
2. Avoid Excessive Neck Extension: Be mindful of your neck’s comfort. If there’s strain, keep the neck in a neutral position or use a prop for support.
3. Gradual Progression: Ease into the depth of the backbend gradually, respecting your body’s limitations.
5. Hold Sphinx Pose for 2 to 4 minutes, gradually increasing the duration as your body becomes more accustomed.
6. Those with serious back issues or recent abdominal surgeries should exercise caution while performing this pose.


Leave A Comment