Step by Step Guide
- Begin with a thorough warm-up, focusing on wrist mobility, shoulder opening, and core engagement.
- Include poses like Downward-Facing Dog, Plank, and Dolphin Pose in your warm-up.
- Kneel on your mat with your knees hip-width apart.
- Place your hands on the mat with fingers spread wide, wrists directly under your shoulders.
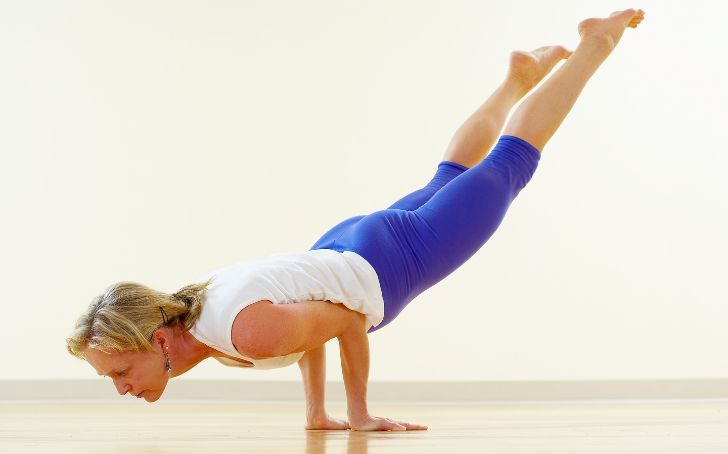
- Bend your elbows and bring them close to your belly.
- Position your elbows so they are parallel and just inside the edges of your abdomen
- Straighten your legs back, lifting your hips and creating a straight line from head to heels.
- Engage your core to support your lower back.
- Lift your legs off the ground, bringing your toes together.
- Initially, you may keep your toes on the ground or lift one leg at a time.
- If comfortable, straighten your legs fully, lifting both feet off the ground.
- Keep your body in a straight line, avoiding any sagging or arching.
- Shift your weight forward onto your elbows, balancing on them.
- Engage your core, and keep your gaze slightly forward.
- Hold the pose for as long as comfortable, breathing deeply.
- Aim to hold for at least 15-30 seconds as you build strength and balance
- To release, lower your legs to the ground and rest in Child’s Pose or another comfortable position.
Benefits of The Peacock Pose (Mayurasana)
- Strengthens Core and Arms: Mayurasana builds strength in the core, arms, and wrists.
- Digestive Stimulation: The pose stimulates the abdominal organs, aiding in digestion.
- Improves Balance and Focus: This advanced arm balance challenges and improves balance and concentration.
Tips for Advanced Practitioners:
- Wrist Warm-Up: Ensure your wrists are adequately warmed up before attempting Mayurasana to prevent strain.
- Elbow Placement: Keep your elbows close to your belly, creating a stable foundation for the pose.
- Leg Engagement: Keep your legs engaged and toes together to maintain balance.
- Avoid this pose if you have wrist, elbow, or shoulder injuries.
- If you’re new to the pose, start by practicing with one leg at a time before attempting to lift both.

Leave A Comment